


With the first major outbreak of malware used to exploit BlueKeep (CVE-2019-0708) on the horizon, companies need to ensure their perimeter is secure now more than ever. If you are reading this and have not yet heard about BlueKeep, you should stop right now and start submitting emergency change requests. This blog post will be here when you get back.
Ok, now that you've patched your Windows hosts and blocked RDP access externally (right?), we can finally get to the point of this article: bypassing multi-factor authentication (MFA) and gaining access to your internal network. We want to walk you through a recent exploit chain we discovered during an external penetration test that allowed us to take advantage of a common misconfiguration and bypass the client's Duo Security MFA solution to gain access to their Outlook Web Access (OWA) service. Wait, we can go farther than Outlook – doesn't your VPN also implement MFA? I thought so.

Here at Focal Point, we also use Duo as our Office365 and VPN MFA solution. Thankfully, the Focal Point IT department was gracious enough to temporarily turn on a certain feature in the Duo Admin console, so I could demonstrate a valid exploit chain against an otherwise secure MFA configuration. So, what's the big fuss about? Allowing employees to self-enroll devices. That's it. Go ahead and submit yet another change request to make sure it's disabled. Grab a coffee while you're at it.
Step 1: Execute a Password-Spraying Attack
Like many other companies who follow best practices like NIST SP 800-53 and the PCI DSS, Focal Point has enabled MFA on all of our externally accessible resources. For those of you who don't know what MFA is, it is the practice of requiring at least two of the following authentication sources to receive a successful response: something you know (password), something you are (biometrics), or something you have (hardware token/phone). For most businesses, this comes in the form of a password plus a security device such as an RSA SecurID hardware token or a Duo mobile push request. We will focus on the latter.
Prior to interacting with the MFA solution, we must first bypass our targeted username/password authentication prompt by locating an employee with weak credentials. Since we are taking a completely black box approach to this attack, we will have to generate a list of potential employee user accounts by scraping publicly-available data sources, such as LinkedIn profiles and breached data. Combining this information with the observed first-initial/last-name username structure used by Focal Point, we can generate a list of potential email addresses with just a few keystrokes.
With a fresh set of email addresses in our pocket, let's craft a password-spraying attack against an external resource, such as the Focal Point Office365 login page. For first timers, a password-spraying attack is a repeated, targeted attempt to log in to a service using known data (such as an email address) and/or constructed data. In a typical brute-force attempt, an attacker will try many different password combinations against a single username, such as "admin", in order to gain access to a specific account. A password-spraying attack is slightly different in that multiple user accounts are tested using a single password candidate to achieve any level of access into the system.
 |
| Figure 1: Focal Point O365 Login Page |
For the purposes of this demonstration, let’s pretend my extremely secure 20-character password is "weak". If you're curious, our original attack was successful using "Spring2019!", a weak password that follows the season, year, and punctuation scheme we encounter far too frequently.
After loading my password into position for the exploit (remember, it's Spring2019!), we launch the password-spraying attack and monitor application response lengths for a positive authentication reply. During the run, it was determined that a response length of 18076 indicated invalid credentials, whereas a response length less than that, combined with a redirection, indicated a successful authentication.
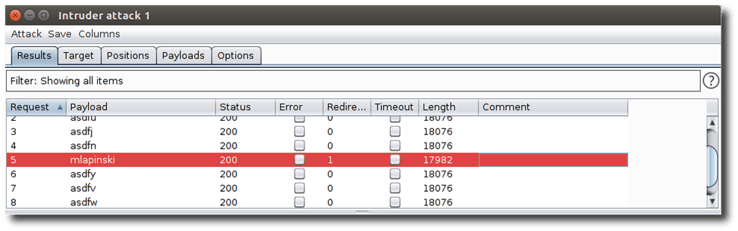 |
|
Figure 2: A response length of less than 18076 indicates a successful authentication response for the mlapinski account. |
So, we've identified a user account with a set of weak credentials – perfect! But wait, you've already considered this scenario, and this is the exact reason why you implemented multi-factor authentication in the first place. Let's attempt to authenticate through a web browser and see what kind of MFA trap is waiting for us.

Step 2: Check MFA Settings
 |
|
Figure 3: An automatic push request is sent to the primary MFA device registered to the account. |
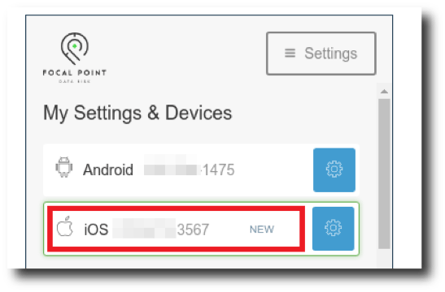
There it is! Like most Duo MFA configurations, an automatic push request to authorize the login is sent to the primary device registered to the compromised account by default. Let's go ahead and cancel that request as quickly as possible because we don't actually want them to "accidentally" give us access just yet. Instead, let's click on that Settings button in the upper right corner and see what kind of options we can get access to with only one level of authentication.
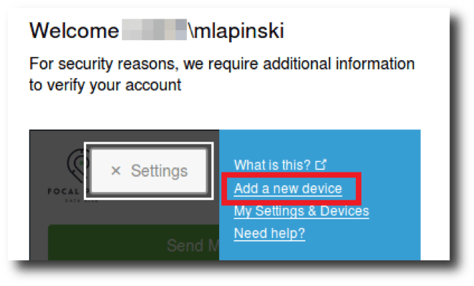 |
|
Figure 4: Users are given the option to self-enroll devices. |
Looks like our IT department trusts us enough to let us register our own devices (thanks again for playing along, IT team!). I appreciate the sentiment, but if a career in information security has taught me anything, it's trust no one. All joking aside, the real driver behind allowing users to self-enroll is more likely to free up internal IT teams to perform more critical tasks other than registering thousands of phones into the MFA system. I certainly wouldn't want to do it.
Well, you probably see where I'm going with this, but let's add a new device to this compromised account and get it over with already.
Step 3: Add a New Device
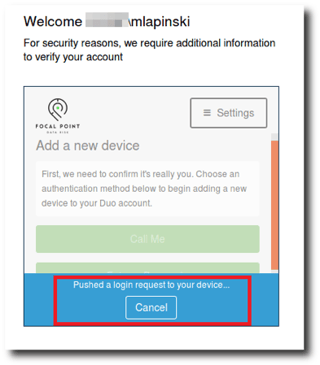 |
|
Figure 5: A Duo push request is issued to add a new device. |
Oh no! Did you think it would be that easy? Thankfully not. In order to register a new device to the compromised account, the attack requires the victim to accept the Duo push request. Now for all of those readers who claim that their employees have taken countless hours of training and would never knowingly accept a push request that they did not issue, I have a counterargument: people love push notifications. I don't believe this attack works because of a lack of security knowledge on behalf of the victim, but due to the fact that the victim has trained themselves to always accept push notifications. After all, when was the last time you rejected one? I can’t remember either. What results is a race condition between your thumb and your brain. I like to think of it as "security fatigue."

With the authorization to add a new device (thank you, thumb), we can begin the process of adding a rogue device to the compromised account. After submitting the phone number, the Duo application presents an efficient QR code to associate the device to the account.
 |
|
Figure 6: The rogue device is successfully added to the Duo account. |
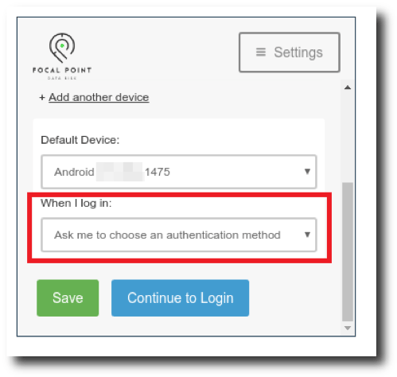
Step 4: Change Default Settings
Success! With an authorized device registered to the compromised account, we can now freely authenticate to any MFA-protected resources at will, be it external VPN access or Office365. In order to remain undetected, we're also going to make an additional change to the default authentication method when using the Duo push system. As you recall, we were ambushed by multiple automatic push requests during our exploit chain, and each of those requests displayed a notification on the victim's phone. If we start constantly spamming push requests every time we try to log in, we're probably going to get caught pretty quickly. Thankfully, there’s an option to allow the user to choose the authentication device prior to issuing a manual push request.
 |
|
Figure 7: Automatic push notifications are disabled. |
Mission Accomplished: Access MFA-Protected Resources
So, there we have it. During our time together, we have scraped potential usernames, conducted an effective password-spray attack against an Outlook Webmail instance, and successfully registered a rogue device as an authorized multi-factor source. In doing so, we have created a persistent method to access internal company resources from a completely external standpoint. Now before you grab your pitchforks and go after the good people at Duo, the exploit chain that we have demonstrated is not the result of a bug in the Duo MFA system, but a misconfiguration in its implementation. It’s more of a cheap trick if I’m being honest, mixed with a dash of social engineering, and a little bit of luck, but it works. Not only does it work more often than you think, but it could also result in an attacker gaining an IP and a foothold in your internal network. Thankfully, the fix is extremely quick and easy: just log into your Duo Admin interface, open up the Settings tab, and uncheck the "Self-service portal" box. You'll also need to create an internal procedure for processing employee devices into the MFA system since users will no longer be able to self-enroll. It also might be a good idea to audit all devices registered to your MFA system to ensure that no rogue devices have already been added.
 |
|
Figure 8: Self-service portal is disabled in the Duo Admin settings. |
Also, let us not forget the initial weak password issue that got us through the first authentication barrier. We all know that we shouldn't use easily guessable passwords, but users will be users. This is why regular password audits should be performed to identify any weak credentials in use. Luckily for you, we have already outlined an easy password auditing procedure on minimal hardware in an earlier blog post. Happy reading!
Want more cyber security insights?
Subscribe to Focal Point's Risk Rundown below - a once-a-month newsletter with templates, webinars, interesting white papers, and news you may have missed. Thousands of your colleagues and competitors have signed up! You can unsubscribe at any time.